Quorum(Raft)
実行環境:Ubuntu20.04
実行日時:
以下の内容をはじめからやっていけば実行できるはずで、node1とnode2を作った際の最終的なディレクトリ構成はこんな感じ
yusuke@DESKTOP-3E7J3N1:~/intern/quorum/fromscratch$ dir
contracts     new-node-1t  node.log   nodekey    pass                 start_tessera.sh  static-nodes.json  tessera2.log
genesis.json  new-node-2   node1.log  nodekey2   private-contract.js  startnode1.sh     tessera.jar
new-node-1    new-node-2t  node2.log  nohup.out  start.sh             startnode2.sh     tessera1.log

yusuke@DESKTOP-3E7J3N1:~/intern/quorum/fromscratch/contracts$ dir
SingleNumRegister.sol  SingleNumRegister_sol_SingleNumRegister.abi  SingleNumRegister_sol_SingleNumRegister.bin

yusuke@DESKTOP-3E7J3N1:~/intern/quorum/fromscratch/new-node-1t$ dir
config.json  db1.mv.db  db1.trace.db  new-node-1.key  new-node-1.pub  pass

yusuke@DESKTOP-3E7J3N1:~/intern/quorum/fromscratch/new-node-1$ dir
enode  geth  history  keystore  nodekey  quorum-raft-state  raft-snap  raft-wal  static-nodes.json
tessera関連
以下のような記事(https://qiita.com/utom/items/11b3e35a7f97dd98c5e6)がある通りJDKが必要かもしれない。(これを試した時はJDKがたまたまUbuntuに入っていたためうまく実行できた)
うまく実行できた時のjavaのバージョン
yusuke@DESKTOP-3E7J3N1:~$ java --version
openjdk 11.0.17 2022-10-18
OpenJDK Runtime Environment (build 11.0.17+8-post-Ubuntu-1ubuntu220.04)
OpenJDK 64-Bit Server VM (build 11.0.17+8-post-Ubuntu-1ubuntu220.04, mixed mode, sharing)
青と黄色:一つ目のノード作成に必要
黄色:二つ目以降のノード作成にも必要
(quorumのインストールと)tessera.jarのダウンロードとリネーム
//quorumのインストールとパスの登録(必要なわけではないがどのみち次の章「quorum関連」で行う)
$ git clone https://github.com/ConsenSys/quorum.git
$ cd quorum
$ make all
$ export PATH=/home/yusuke/intern/quorum/build/bin:$PATH

//tessera.jarのダウンロードとリネーム
$ wget https://oss.sonatype.org/service/local/repositories/releases/content/com/jpmorgan/quorum/tessera-app/0.10.4/tessera-app-0.10.4-app.jar
$ mv tessera-app-0.10.4-app.jar tessera.jar
keyの作成
tessera node1のディレクトリを作成、及び鍵の生成
今回はこのサイト(https://baasinfo.net/?p=3432)に従い、fromscratchディレクトリ下にノードの作業ディレクトリを作成した。
$ mkdir fromscratch
$ cd fromscratch
$ mkdir new-node-1t
$ cd new-node-1t
$ java -jar ../tessera.jar -keygen -filename new-node-1
最後のコマンドを打つとパスワードを求めてくる。これはのちにconfig.jsonを作る際に必要になる。
今回はpasswordはmanchester1!
処理が終わるとnew-node-1.keyとnew-node-1.pubが作成されている。
configファイル作成
(new-node-1t/config.json)
$ touch config.json
$ touch pass
config.json(
yourpathの部分を変更する必要がある)今回はこれを作る当初からネットワークで接続するノードは二つと決めていたため、
peerには二つurlが入っている。{ "useWhiteList": false, "jdbc": { "username": "sa", "password": "", "url": "jdbc:h2:/yourpath/new-node-1t/db1;MODE=Oracle;TRACE_LEVEL_SYSTEM_OUT=0", "autoCreateTables": true }, "serverConfigs":[ { "app":"ThirdParty", "enabled": true, "serverAddress": "http://localhost:9081", "communicationType" : "REST" }, { "app":"Q2T", "enabled": true, "serverAddress":"unix:/yourpath/new-node-1t/tm.ipc", "communicationType" : "REST" }, { "app":"P2P", "enabled": true, "serverAddress":"http://localhost:9001", "sslConfig": { "tls": "OFF" }, "communicationType" : "REST" } ], "peer": [ { "url": "http://localhost:9001" }, { "url": "http://localhost:9003" } ], "keys": { "passwords": [], "keyData": [ { "privateKeyPath": "/yourpath/new-node-1t/new-node-1.key", "publicKeyPath": "/yourpath/new-node-1t/new-node-1.pub" } ] }, "alwaysSendTo": [] }
pass(
<new-node-1t作成時に入力したパスワード>の部分を変更する必要がある)<new-node-1t作成時に入力したパスワード>
config.json(この資料作成時の例)
{
  "useWhiteList": false,
  "jdbc": {
    "username": "sa",
    "password": "",
    "url": "jdbc:h2:/home/yusuke/intern/quorum/fromscratch/new-node-1t/db1;MODE=Oracle;TRACE_LEVEL_SYSTEM_OUT=0",
    "autoCreateTables": true
  },
  "serverConfigs": [
    {
      "app": "ThirdParty",
      "enabled": true,
      "serverAddress": "http://localhost:9081",
      "communicationType": "REST"
    },
    {
      "app": "Q2T",
      "enabled": true,
      "serverAddress": "unix:/home/yusuke/intern/quorum/fromscratch/new-node-1t/tm.ipc",
      "communicationType": "REST"
    },
    {
      "app": "P2P",
      "enabled": true,
      "serverAddress": "http://localhost:9001",
      "sslConfig": {
        "tls": "OFF"
      },
      "communicationType": "REST"
    }
  ],
  "peer": [
    {
      "url": "http://localhost:9001"
    },
    {
      "url": "http://localhost:9003"
    }
  ],
  "keys": {
    "passwordFile": "/home/yusuke/intern/quorum/fromscratch/new-node-1t/pass",
    "keyData": [
      {
        "privateKeyPath": "/home/yusuke/intern/quorum/fromscratch/new-node-1t/new-node-1.key",
        "publicKeyPath": "/home/yusuke/intern/quorum/fromscratch/new-node-1t/new-node-1.pub"
      }
    ]
  },
  "alwaysSendTo": []
}
pass(この資料作成時の例)
manchester1!
keyの作成、configファイル作成をnew-node-2tについてもやる
先ほどとほぼ同じでよい。
正し、config.jsonとpassは変更する必要がある。
$ mkdir new-node-2t
$ cd new-node-2t
$ java -jar ../tessera.jar -keygen -filename new-node-2
$ touch config.json
$ touch passconfig.jsonはyourpath以外にもポート番号等変わっているところがあるため、以下のファイルをコピーしてyourpathを変更した方が良い。
config.jsonの中身(
yourpathの部分を変更する必要がある){ "useWhiteList": false, "jdbc": { "username": "sa", "password": "", "url": "jdbc:h2:yourpath/new-node-2t/db1;MODE=Oracle;TRACE_LEVEL_SYSTEM_OUT=0", "autoCreateTables": true }, "serverConfigs":[ { "app":"ThirdParty", "enabled": true, "serverAddress": "http://localhost:9083", "communicationType" : "REST" }, { "app":"Q2T", "enabled": true, "serverAddress":"unix:/yourpath/new-node-2t/tm.ipc", "communicationType" : "REST" }, { "app":"P2P", "enabled": true, "serverAddress":"http://localhost:9003", "sslConfig": { "tls": "OFF" }, "communicationType" : "REST" } ], "peer": [ { "url": "http://localhost:9001" }, { "url": "http://localhost:9003" } ], "keys": { "passwords": [], "keyData": [ { "privateKeyPath": "/yourpath/new-node-2t/new-node-2.key", "publicKeyPath": "/yourpath/new-node-2t/new-node-2.pub" } ] }, "alwaysSendTo": [] }
config.jsonの中身(この資料作成時の例)
{
  "useWhiteList": false,
  "jdbc": {
    "username": "sa",
    "password": "",
    "url": "jdbc:h2:/home/yusuke/intern/quorum/fromscratch/new-node-2t/db1;MODE=Oracle;TRACE_LEVEL_SYSTEM_OUT=0",
    "autoCreateTables": true
  },
  "serverConfigs": [
    {
      "app": "ThirdParty",
      "enabled": true,
      "serverAddress": "http://localhost:9083",
      "communicationType": "REST"
    },
    {
      "app": "Q2T",
      "enabled": true,
      "serverAddress": "unix:/home/yusuke/intern/quorum/fromscratch/new-node-2t/tm.ipc",
      "communicationType": "REST"
    },
    {
      "app": "P2P",
      "enabled": true,
      "serverAddress": "http://localhost:9003",
      "sslConfig": {
        "tls": "OFF"
      },
      "communicationType": "REST"
    }
  ],
  "peer": [
    {
      "url": "http://localhost:9001"
    },
    {
      "url": "http://localhost:9003"
    }
  ],
  "keys": {
    "passwordFile": "/home/yusuke/intern/quorum/fromscratch/new-node-2t/pass",
    "keyData": [
      {
        "privateKeyPath": "/home/yusuke/intern/quorum/fromscratch/new-node-2t/new-node-2.key",
        "publicKeyPath": "/home/yusuke/intern/quorum/fromscratch/new-node-2t/new-node-2.pub"
      }
    ]
  },
  "alwaysSendTo": []
}
pass(この資料作成時の例)
二つ目ではパスワードは以下。
manchester2!
tessera nodeの起動スクリプト作成と起動
new-node-1tの一つ上の階層に戻ってからtessera nodeの起動スクリプトを作成する。
$ touch start_tessera.shstart_tessera.sh
#!/bin/bash
java -jar tessera.jar --configfile new-node-1t/config.json >> tessera1.log 2>&1 &
java -jar tessera.jar --configfile new-node-2t/config.json >> tessera2.log 2>&1 &
tessera nodeの起動
$ chmod +x start_tessera.sh
$ ./start_tessera.sh
起動確認
例えばnew-node-1tの下には以下のファイルがあるはず
config.json
db1.trace.db
db1.mv.db
new-node-1.key
new-node-1.pub
pass
tm.ipc
また、起動するとjavaと書かれたプロセスが二つ走っているはずである。
yusuke@DESKTOP-3E7J3N1:~/intern/quorum/fromscratch$ chmod +x start_tessera.sh
yusuke@DESKTOP-3E7J3N1:~/intern/quorum/fromscratch$  ./start_tessera.sh
yusuke@DESKTOP-3E7J3N1:~/intern/quorum/fromscratch$ ps
  PID TTY          TIME CMD
   10 pts/0    00:00:03 bash
 4325 pts/0    00:00:42 java
 4326 pts/0    00:00:48 java
 4425 pts/0    00:00:05 ps
ちなみに起動スクリプトを作らないなら、それぞれのディレクトリ(new-node-1tなど)で以下を実行する
$ java -jar ../tessera.jar --configfile config.json
quorum関連
Quorumを本番利用するには複数ノードでネットワークを構築する必要。その場合には別のPCなどでノードを構築し、設定ファイルを共有し、お互いにネットワークを接続できる状態にするなどの設定が必要。
このような面倒な設定を数分でできるようにしているのがAzure Blockchain ServiceなどのBaaS。ただ、今回はローカルでノードを作成しており、これらのサービスを使用してはいない。
QuorumではRaft, IBFT, PoAの三種類のコンセンサスアルゴリズムが選べるが、今回は一番簡単なRaftを利用して構築する。
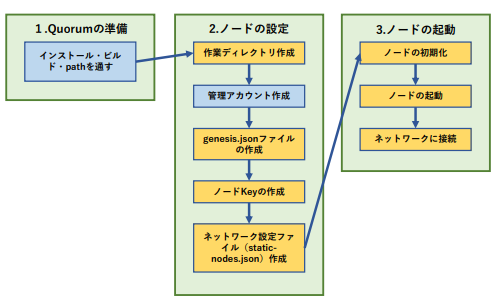
全体の手順
1.quorumの準備
2.nodeの設定
3.nodeの起動
4.二つ目のノードを作成・ネットワークに追加
青と黄色:一つ目のノード作成に必要
黄色:二つ目以降のノード作成にも必要
1.quorumの準備
Quorumのネットワークを構築するには、Quorumに対応したGethなどのツールをインストールする必要があります。
まずはQuorumをインストール・ビルドしましょう。
(tessera関連系の一番初めでやっている場合はする必要ない)
$ git clone https://github.com/ConsenSys/quorum.git
$ cd quorum
$ make all
$ export PATH=/home/yusuke/intern/quorum/build/bin:$PATH
2.nodeの設定
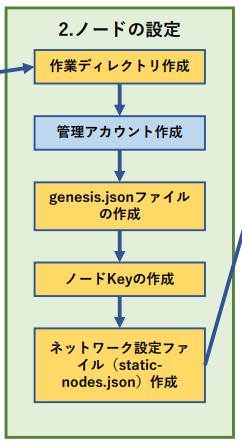
Nodeは、Quorumのネットワークに参加する一つのマシーンです。Nodeを構築するためには、以下のものを作成します。
- Nodeの作業ディレクトリ
- Nodeを管理するアカウント
- ブロックチェーンの初期状態を記述するジェネシスファイル
- Nodeの鍵(nodekey)の作成
- ネットワーク設定ファイルstatic-nodes.jsonの作成
node作業ディレクトリの作成
上二つ(fromscratchディレクトリ作成まで)はtessera関連系でも同様のことを行っている。すでに作っていない場合のみ上2行は実行。
$ mkdir fromscratch
$ cd fromscratch
$ mkdir new-node-1
node管理アカウントの作成
パスフレーズの入力を求められるので、任意のパスフレーズを入力してください。このパスフレーズは重要なので保存して無くさないようにしてください。
$ geth --datadir new-node-1 account newpasswordはmanchester!
実行結果
yusuke@DESKTOP-3E7J3N1:~/intern/quorum/fromscratch$ geth --datadir new-node-1 account new
INFO [01-22|11:49:00.892] Maximum peer count                       ETH=50 LES=0 total=50
INFO [01-22|11:49:00.893] Smartcard socket not found, disabling    err="stat /run/pcscd/pcscd.comm: no such file or directory"
Your new account is locked with a password. Please give a password. Do not forget this password.
Password:
Repeat password:

Your new key was generated

Public address of the key:   0xd12073ce3A32390c39b9c4a730D8b8686fFfa68C
Path of the secret key file: new-node-1/keystore/UTC--2023-01-22T02-49-19.216866000Z--d12073ce3a32390c39b9c4a730d8b8686fffa68c

- You can share your public address with anyone. Others need it to interact with you.
- You must NEVER share the secret key with anyone! The key controls access to your funds!
- You must BACKUP your key file! Without the key, it's impossible to access account funds!
- You must REMEMBER your password! Without the password, it's impossible to decrypt the key!
genesis.jsonファイルの作成
$ touch genesis.json以下のgenesis.jsonファイルをコピペし、allocの中のアドレス部分に先ほど作成した管理アカウントを作った際のアドレスを入れる。
注意!
configの中に必ず "constantinopleBlock": 0,をいれる。でないと後で行うトランザクションがうまくできない。
genesis.jsonの中身
{
  "alloc": {
   // 0xから実際のアドレスで置き換える
    "0xd12073ce3A32390c39b9c4a730D8b8686fFfa68C": {
      "balance": "1000000000000000000000000000"
    }
  },
  "coinbase": "0x0000000000000000000000000000000000000000",
  "config": {
    "homesteadBlock": 0,
    "byzantiumBlock": 0,
    "constantinopleBlock": 0,
    "chainId": 10,
    "eip150Block": 0,
    "eip155Block": 0,
    "eip150Hash": "0x0000000000000000000000000000000000000000000000000000000000000000",
    "eip158Block": 0,
    "isQuorum": true
  },
  "difficulty": "0x0",
  "extraData": "0x0000000000000000000000000000000000000000000000000000000000000000",
  "gasLimit": "0xE0000000",
  "mixhash": "0x00000000000000000000000000000000000000647572616c65787365646c6578",
  "nonce": "0x0",
  "parentHash": "0x0000000000000000000000000000000000000000000000000000000000000000",
  "timestamp": "0x00"
}
ノードKeyの作成
Node Keyとは、ノードを識別するためのキーで、IDとして利用されます。bootnodeコマンドを利用してNode Keyを作成しましょう。
作成した鍵は作業ディレクトリにも保存します。
$ bootnode --genkey=nodekey
$ cp nodekey new-node-1/
以下のコマンドでenode(ethereum node)のIDとなるアドレスを確認。
$ bootnode --nodekey=new-node-1/nodekey --writeaddress > new-node-1/enode
$ cat new-node-1/eno

yusuke@DESKTOP-3E7J3N1:~/intern/quorum/fromscratch$ cat new-node-1/enode
0f2b20671318911937b92275b2690aaf4cf34aa180e296fcd88b8095dc225139c926c786f719cfe5f1f03bde5ee272cbd6be65ecbd934dfd9aab177816f643f3
static-nodes.jsonの作成
static-nodes.jsonはプライベートネットワークに初期に参加しているノードの一覧を記述するファイルです。
ここに記述されていないノードは別途コマンドによってネットワークに追加する必要があります。
今回はノードは自分のノード一つだけなので、自分の設定を記述します。
$ touch static-nodes.jsonstatic-nodes.jsonの中身
先ほどつくったenodeをこんな感じで代入する
[
    "enode://<手順3で確認したenodeのハッシュ値@127.0.0.1:21000?discport=0&raftport=50000"
]
今回はこんなかんじ。
[
  "enode://0f2b20671318911937b92275b2690aaf4cf34aa180e296fcd88b8095dc225139c926c786f719cfe5f1f03bde5ee272cbd6be65ecbd934dfd9aab177816f643f3@127.0.0.1:21000?discport=0&raftport=50000"
]
これでnode起動準備が整った。
3.nodeの起動
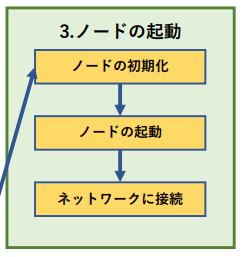
nodeの初期化
これまでの手順で作成した設定を元に、ノードを起動します。
*注意 一度コンソールを閉じるなどによりPathが通っていないと失敗します。失敗する場合はもう一度quorumディレクトリで
export PATH=$(pwd)/build/bin:$PATHを実行してください。
まずはノードの設定を初期化する
$ geth --datadir new-node-1 init genesis.jsonnodeの起動
$ touch startnode1.shstartnode1.shの中身(tessera使用時)
#!/bin/bash
PRIVATE_CONFIG=/home/yusuke/intern/quorum/fromscratch/new-node-1t/tm.ipc nohup geth --datadir new-node-1 --nodiscover --verbosity 5 --networkid 31337 --raft --raftport 50000 --unlock 0xd12073ce3A32390c39b9c4a730D8b8686fFfa68C --password /home/yusuke/intern/quorum/fromscratch/pass --rpcaddr 0.0.0.0 --rpcport 22000 --rpcapi admin,db,eth,debug,miner,net,shh,txpool,personal,web3,quorum,raft --emitcheckpoints --port 21000 >> node.log 2>&1 &
startnode1.shの中身(tessera不使用時)
#!/bin/bash
PRIVATE_CONFIG=ignore nohup geth --datadir new-node-1 --nodiscover --verbosity 5 --networkid 31337 --raft --raftport 50000 --rpc --rpcaddr 0.0.0.0 --rpcport 22000 --rpcapi admin,db,eth,debug,miner,net,shh,txpool,personal,web3,quorum,raft --emitcheckpoints --port 21000 >> node.log 2>&1 &
startnode1.shで
--rpcを--unlock 0xd12073ce3A32390c39b9c4a730D8b8686fFfa68C --password /home/yusuke/intern/quorum/fromscratch/passにする必要がある。
これは後にプライベートネットを使用する際のためのもので、このサイト(https://qiita.com/bc_yuuuuuki/items/2e3ba6a2caa68848920e)によればether送金時に
authentication needed: password or unlockが出てしまう対処方法の一つとして、geth起動時にアンロックオプションを指定することがあげられている。
起動スクリプトを実行できる状態にして実行する
$ chmod +x startnode1.sh
$ ./startnode1.sh
これでノードの起動が完了
ネットワークに接続
ノードが起動したのでネットワークに接続してみましょう。
gethを利用し、以下のコマンドでネットワークに接続できます。
$ geth attach new-node-1/geth.ipcでコマンドモードになるはず。なったらraft.clusterと打つ。
実行結果
yusuke@DESKTOP-3E7J3N1:~/intern/quorum/fromscratch$ geth attach new-node-1/geth.ipc
Welcome to the Geth JavaScript console!

instance: Geth/v1.10.3-stable-93c5f781(quorum-v22.7.5)/linux-amd64/go1.16.4
coinbase: 0xcb368f634587cd4bfb12b42ca521963dc1f14173
at block: 0 (Thu Jan 01 1970 09:00:00 GMT+0900 (JST))
 datadir: /home/yusuke/intern/quorum/fromscratch/new-node-1
 modules: admin:1.0 debug:1.0 eth:1.0 ethash:1.0 miner:1.0 net:1.0 personal:1.0 raft:1.0 rpc:1.0 txpool:1.0 web3:1.0

To exit, press ctrl-d
> raft.cluster
[{
    hostname: "127.0.0.1",
    nodeActive: true,
    nodeId: "dd2b08e2880a2e77596803a14aaceb101917f6ed382e0dd0410a3834e98beb6f30aa4717623d96c36ac3040318ca17a69e3d8bfe5d57d03421b07eabf1c43ccc",
    p2pPort: 21000,
    raftId: 1,
    raftPort: 50000,
    role: "minter"
}]
これでノードを管理するアカウントと、一つ目のノードの起動までが終了した。
次は二つ目のノードを作成する。
4.二つ目のノードを作成・ネットワークに追加
以下の図の黄色いところをやる。
「作業ディレクトリ作成」~「static-nodes.json作成」までのコマンド
一回目とほぼ同じなので説明は省略。
yusuke@DESKTOP-3E7J3N1:~/intern/quorum/fromscratch$ mkdir new-node-2
yusuke@DESKTOP-3E7J3N1:~/intern/quorum/fromscratch$ bootnode --genkey=nodekey2
yusuke@DESKTOP-3E7J3N1:~/intern/quorum/fromscratch$ cp nodekey2 new-node-2/nodekey
yusuke@DESKTOP-3E7J3N1:~/intern/quorum/fromscratch$ bootnode --nodekey=new-node-2/nodekey --writeaddress
ab3d04944893ace2f427c8cfe750b06338971c77ac1dceae26173f41746066ea33a7d4334b78073894b5cb0c756866f1e8a1c960816038371532aa02f43d2afb
yusuke@DESKTOP-3E7J3N1:~/intern/quorum/fromscratch$ cd new-node-2
yusuke@DESKTOP-3E7J3N1:~/intern/quorum/fromscratch/new-node-2$ touch static-nodes.json
一つ目のノード作成と異なるところ。static-node-jsonは以下のように。
[
  // 一つ目のノードの設定をそのまま
  "enode://0f2b20671318911937b92275b2690aaf4cf34aa180e296fcd88b8095dc225139c926c786f719cfe5f1f03bde5ee272cbd6be65ecbd934dfd9aab177816f643f3@127.0.0.1:21000?discport=0&raftport=50000",
  // 上で生成されたアドレスを利用。ポートとraptportをそれぞれ21001と50001に書き換える
  "enode://ab3d04944893ace2f427c8cfe750b06338971c77ac1dceae26173f41746066ea33a7d4334b78073894b5cb0c756866f1e8a1c960816038371532aa02f43d2afb@127.0.0.1:21001?discport=0&raftport=50001",
]
ここでnew-node-1配下のstatic-node.jsonも同様に変更するのかがわからない。念のため変更して実行するとうまくいく。変更せずに、つまりnode1のenodeのみしか書かれていない状態で実行はしていない。
ノードの初期化と起動のためのスクリプト作成
一回目同様初期化
yusuke@DESKTOP-3E7J3N1:~/intern/quorum/fromscratch$ geth --datadir new-node-2 init genesis.json
ちなみに、以下のようなエラー出たらpathの登録ができてない。
yusuke@DESKTOP-3E7J3N1:~/intern/quorum/fromscratch$ geth --datadir new-node-2 init genesis.json

Command 'geth' not found, did you mean:

  command 'gth' from deb genomethreader (1.7.3+dfsg-5)

Try: sudo apt install <deb name>
node2の起動スクリプトの作成
startnodes2.shの中身(tessera使用時)
#!/bin/bash
PRIVATE_CONFIG=/home/yusuke/intern/quorum/fromscratch/new-node-2t/tm.ipc  nohup geth --datadir new-node-2 --nodiscover --verbosity 5 --networkid 31337 --raft --raftport 50001 --raftjoinexisting 2  --rpc --rpcaddr 0.0.0.0 --rpcport 22001 --rpcapi admin,db,eth,debug,miner,net,shh,txpool,personal,web3,quorum,raft --emitcheckpoints --port 21001 2>>node2.log &
startnodes2.shの中身(tessera不使用時)
#!/bin/bash
PRIVATE_CONFIG=ignore nohup geth --datadir new-node-2 --nodiscover --verbosity 5 --networkid 31337 --raft --raftport 50001 --raftjoinexisting 2 --rpc --rpcaddr 0.0.0.0 --rpcport 22001 --rpcapi admin,db,eth,debug,miner,net,shh,txpool,personal,web3,quorum,raft --emitcheckpoints --port 21001 2>>node2.log &
起動
yusuke@DESKTOP-3E7J3N1:~/intern/quorum/fromscratch$ chmod +x startnode2.sh
yusuke@DESKTOP-3E7J3N1:~/intern/quorum/fromscratch$ ./startnode2.sh
yusuke@DESKTOP-3E7J3N1:~/intern/quorum/fromscratch$ ps
  PID TTY          TIME CMD
 1930 pts/1    00:00:00 bash
 4316 pts/1    00:00:08 geth
 4561 pts/1    00:00:00 geth
 4576 pts/1    00:00:00 ps
gethがふたつ、つまりnode1とnode2が動いている。
※やりたいことが終わったら、プロセスはkill。(まだネットワークの追加等あるので殺す必要はないが)
yusuke@DESKTOP-3E7J3N1:~/intern/quorum/fromscratch$ ps | grep geth
 4316 pts/1    00:00:20 geth
 4561 pts/1    00:00:12 geth
yusuke@DESKTOP-3E7J3N1:~/intern/quorum/fromscratch$ kill 4316
二つ目のノードをネットワークに追加
node1でネットワークに接続した後、コマンドモードみたいなのになるので、raft.addPeerコマンドで二つ目のノードをネットワークに追加。
yusuke@DESKTOP-3E7J3N1:~/intern/quorum/fromscratch$ geth attach new-node-1/geth.ipc
Welcome to the Geth JavaScript console!

instance: Geth/v1.10.3-stable-93c5f781(quorum-v22.7.5)/linux-amd64/go1.16.4
coinbase: 0xd12073ce3a32390c39b9c4a730d8b8686fffa68c
at block: 0 (Thu Jan 01 1970 09:00:00 GMT+0900 (JST))
 datadir: /home/yusuke/intern/quorum/fromscratch/new-node-1
 modules: admin:1.0 debug:1.0 eth:1.0 ethash:1.0 miner:1.0 net:1.0 personal:1.0 raft:1.0 rpc:1.0 txpool:1.0 web3:1.0

To exit, press ctrl-d
> raft.addPeer('enode://ab3d04944893ace2f427c8cfe750b06338971c77ac1dceae26173f41746066ea33a7d4334b78073894b5cb0c756866f1e8a1c960816038371532aa02f43d2afb@127.0.0.1:21001?discport=0&raftport=50001')
2
その後、raftと入力し、出力結果を確認。
rafrId=1でリーダーノードである一つ目のノードが、raftId=2で二つ目のノードがネットワークに接続されていることがわかる。
nodeActiveを見てわかる通り、今は二つ目のノードは起動されておらず一つ目のノードしか起動されていないことになっている。
> raft
{
  cluster: [{
      hostname: "127.0.0.1",
      nodeActive: false,
      nodeId: "ab3d04944893ace2f427c8cfe750b06338971c77ac1dceae26173f41746066ea33a7d4334b78073894b5cb0c756866f1e8a1c960816038371532aa02f43d2afb",
      p2pPort: 21001,
      raftId: 2,
      raftPort: 50001,
      role: "verifier"
  }, {
      hostname: "127.0.0.1",
      nodeActive: true,
      nodeId: "0f2b20671318911937b92275b2690aaf4cf34aa180e296fcd88b8095dc225139c926c786f719cfe5f1f03bde5ee272cbd6be65ecbd934dfd9aab177816f643f3",
      p2pPort: 21000,
      raftId: 1,
      raftPort: 50000,
      role: "minter"
  }],
  leader: "0f2b20671318911937b92275b2690aaf4cf34aa180e296fcd88b8095dc225139c926c786f719cfe5f1f03bde5ee272cbd6be65ecbd934dfd9aab177816f643f3",
  role: "minter",
  addLearner: function(),
  addPeer: function(),
  getCluster: function(callback),
  getLeader: function(callback),
  getRole: function(callback),
  promoteToPeer: function(),
  removePeer: function()
}
コントラクトのコンパイル
コントラクトをコンパイルするためのライブラリをインストール
$ npm install -g solc以下の内容でコントラクトを作成
// SPDX-License-Identifier: MIT
pragma solidity 0.8.17;

contract SingleNumRegister {
    uint storedData;
    function set(uint x) public{
        storedData = x;
    }
    function get() public view returns (uint){
        return storedData;
    }
}
コントラクトと同一の階層に移動し、下記コマンドを実行してコンパイル
$ cd contracts
$ solcjs --abi --bin SingleNumRegister.sol
すると、abiファイルとbinファイルが出力される。
これでコンパイル完了。
コントラクトのデプロイ
これまでのセクションを連続して行っていた場合はいらないが、ここから始める場合は、まずはノードを起動する。こんな感じでやる。
yusuke@DESKTOP-3E7J3N1:~$ cd intern/
yusuke@DESKTOP-3E7J3N1:~/intern$ cd quorum/
yusuke@DESKTOP-3E7J3N1:~/intern/quorum$ cd fromscratch/
yusuke@DESKTOP-3E7J3N1:~/intern/quorum/fromscratch$ export PATH=/home/yusuke/intern/quorum/build/bin:$PATH
yusuke@DESKTOP-3E7J3N1:~/intern/quorum/fromscratch$ chmod +x start_tessera.sh
yusuke@DESKTOP-3E7J3N1:~/intern/quorum/fromscratch$ ./start_tessera.sh
yusuke@DESKTOP-3E7J3N1:~/intern/quorum/fromscratch$ chmod +x startnode1.sh
yusuke@DESKTOP-3E7J3N1:~/intern/quorum/fromscratch$ chmod +x startnode2.sh
yusuke@DESKTOP-3E7J3N1:~/intern/quorum/fromscratch$ ./startnode1.sh
yusuke@DESKTOP-3E7J3N1:~/intern/quorum/fromscratch$ ./startnode2.sh
yusuke@DESKTOP-3E7J3N1:~/intern/quorum/fromscratch$ ps
  PID TTY          TIME CMD
   10 pts/0    00:00:00 bash
 1403 pts/0    00:01:31 java
 1404 pts/0    00:01:36 java
 2048 pts/0    00:00:01 geth
 2065 pts/0    00:00:00 geth
 2080 pts/0    00:00:00 ps
デプロイは以下の手順で行う。
なお、 personal.unlockAccount(eth.accounts[0])で初めに作ったアカウントのパスフレーズを求めている.。ちなみにパスフレーズはmanchester!である。
なお、startnode1.shでgeth起動時にアンロックオプションを指定している場合はこの段取りはいらない。
yusuke@DESKTOP-3E7J3N1:~/intern/quorum/fromscratch$ geth attach new-node-1/geth.ipc
Welcome to the Geth JavaScript console!

instance: Geth/v1.10.3-stable-93c5f781(quorum-v22.7.5)/linux-amd64/go1.16.4
coinbase: 0xd12073ce3a32390c39b9c4a730d8b8686fffa68c
at block: 10 (Invalid Date)
 datadir: /home/yusuke/intern/quorum/fromscratch/new-node-1
 modules: admin:1.0 debug:1.0 eth:1.0 ethash:1.0 miner:1.0 net:1.0 personal:1.0 quorumExtension:1.0 raft:1.0 rpc:1.0 txpool:1.0 web3:1.0

To exit, press ctrl-d
> personal.unlockAccount(eth.accounts[0])
Unlock account 0xd12073ce3a32390c39b9c4a730d8b8686fffa68c
Passphrase:
true
つぎにabiファイル、binファイルの中身をそれぞれコピーし、binとabiという変数に代入する。
コマンドの実行結果に戻り値が存在しない場合は、コンソールに「undefined」と表示されますが、コマンドは正常に終了しています。
続けて、これらの変数を用いて下記のコマンドを実行し、コントラクトをデプロイします。
今回はprivateForにnode2のアドレス(公開鍵)を指定することで、node2のみに公開するコントラクトとしてデプロイする。
node2の公開鍵は、/home/yusuke/intern/quorum/fromscratch/new-node-2t/new-node-2.pubにある。
privateForの指定先として自分自身は無理らしい。
> var bin = "0x<binファイルの中身>"
> var abi = <abiファイルの中身>
> var contract = eth.contract(abi)
> var myContract = contract.new({ from: eth.accounts[0], data: bin, privateFor:["<new-node-2のアドレス(公開鍵)>"]})
実行結果
> var bin = "0x608060405234801561001057600080fd5b50610150806100206000396000f3fe608060405234801561001057600080fd5b50600436106100365760003560e01c806360fe47b11461003b5780636d4ce63c14610057575b600080fd5b610055600480360381019061005091906100c3565b610075565b005b61005f61007f565b60405161006c91906100ff565b60405180910390f35b8060008190555050565b60008054905090565b600080fd5b6000819050919050565b6100a08161008d565b81146100ab57600080fd5b50565b6000813590506100bd81610097565b92915050565b6000602082840312156100d9576100d8610088565b5b60006100e7848285016100ae565b91505092915050565b6100f98161008d565b82525050565b600060208201905061011460008301846100f0565b9291505056fea2646970667358221220124fa01fad4a306ed177fef33b0cb598e05cd395a47431759a884c5d35fb44fc64736f6c63430008110033"
undefined
> var abi = [{"inputs":[],"name":"get","outputs":[{"internalType":"uint256","name":"","type":"uint256"}],"stateMutability":"view","type":"function"},{"inputs":[{"internalType":"uint256","name":"x","type":"uint256"}],"name":"set","outputs":[],"stateMutability":"nonpayable","type":"function"}]
undefined
> var contract = eth.contract(abi)
undefined
> var myContract = contract.new({ from: eth.accounts[0], data: bin, privateFor:["VVkUHXSVh/TFcifyfvUwcJlUuHs3PMv2xsQQVvb+Xhk="]})
undefined
デプロイしたコントラクトのアドレスを確認。
> myContract.address
"0xeb7d1b6b9957543aafd1a8cb25ecdbb1753398aa"
node1でnode2に対するプライベートトランザクションを発行
コントラクトの関数「set」をプライベートトランザクションとして呼び出す。
> var private = eth.contract(myContract.abi).at(myContract.address)
> private.set(11,{from:eth.accounts[0],privateFor:["<new-node-2のアドレス(公開鍵)>"]})
実行結果
> var private = eth.contract(myContract.abi).at(myContract.address)
> private.set(16,{from:eth.accounts[0],privateFor:["VVkUHXSVh/TFcifyfvUwcJlUuHs3PMv2xsQQVvb+Xhk="]})> private.set(16,{from:eth.accounts[0],privateFor:["VVkUHXSV> private.set(16,{from:eth.accounts[0],privateFor:["VVkUHXSVh/TFcifyfvUwcJlUuHs3PMv2xsQQVvb+Xhk="]})
"0x29df75600aace91a5c6efe53a1c0ebc70052ee0ea375bcce7b0d928058382e40"
トランザクションの状態を確認。
> eth.getTransaction("0x29df75600aace91a5c6efe53a1c0ebc70052ee0ea375bcce7b0d928058382e40")
{
  blockHash: "0xa05fff4530277f1bf845269767b8e2418aa41434241f20104227f898212dde80",
  blockNumber: 12,
  from: "0xd12073ce3a32390c39b9c4a730d8b8686fffa68c",
  gas: 45750,
  gasPrice: 0,
  hash: "0x29df75600aace91a5c6efe53a1c0ebc70052ee0ea375bcce7b0d928058382e40",
  input: "0xfa89d24a070a24ed9769288daee617b5f33bba23a75c83a01a01d5928ae750530542eeb30e7e092ad179178a086f2fcaf5b834e9c6b230e11b6976118e4a9ff5",
  nonce: 11,
  r: "0xd3b8e3f1c0ddf725b0b40d94c46ffa72beb05163446a97becf864f8632d2bb2f",
  s: "0x71d2b1f7b9097db896738cc62c0272326dfebd0d3ef7534a2649f5baff1f5c20",
  to: "0xeb7d1b6b9957543aafd1a8cb25ecdbb1753398aa",
  transactionIndex: 0,
  type: "0x0",
  v: "0x26",
  value: 0
}
コントラクトの関数「get」を呼び出して登録した値を参照。
> private.get.call()
16
setで登録した値が返ってきている。
node2でコントラクトの状態を確認
別途node2のコンソールを開く。
abiにはコントラクトのabiを、addressはデプロイしたコントラクトのアドレスを入れる。
コントラクトの関数getを呼び出すと先ほどnode1で登録した値が読み取れる。
> var abi = <abiファイルの中身>
> var address = "<前述でデプロイしたコントラクトのアドレス>"
> var private = eth.contract(abi).at(address)
> private.get.call()
実行結果
yusuke@DESKTOP-3E7J3N1:~/intern/quorum/fromscratch$ geth attach new-node-2/geth.ipc
Welcome to the Geth JavaScript console!

instance: Geth/v1.10.3-stable-93c5f781(quorum-v22.7.5)/linux-amd64/go1.16.4
at block: 12 (Invalid Date)
 datadir: /home/yusuke/intern/quorum/fromscratch/new-node-2
 modules: admin:1.0 debug:1.0 eth:1.0 ethash:1.0 miner:1.0 net:1.0 personal:1.0 quorumExtension:1.0 raft:1.0 rpc:1.0 txpool:1.0 web3:1.0

To exit, press ctrl-d
> var abi = [{"inputs":[],"name":"get","outputs":[{"internalType":"uint256","name":"","type":"uint256"}],"stateMutability":"view","type":"function"},{"inputs":[{"internalType":"uint256","name":"x","type":"uint256"}],"name":"set","outputs":[],"stateMutability":"nonpayable","type":"function"}]
undefined
> var address = "0xeb7d1b6b9957543aafd1a8cb25ecdbb1753398aa"
undefined
> var private = eth.contract(abi).at(address)
undefined
> private.get.call()
16もしここでnode3から同じようにやると、最後の出力は0になる。node3からはプライベートトランザクションはよみとれないようになっている。